Announcement

Collapse
No announcement yet.

Finished my garage build and I'm EXTREMELY happy!

Collapse
X
 
  • Filter
  • Time
  • Show
Clear All
new posts

  • Finished my garage build and I'm EXTREMELY happy!

    -Video link below-


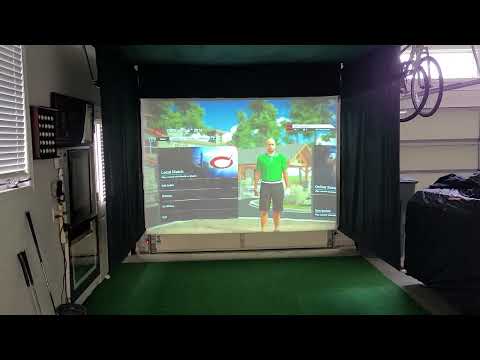
    Just finished installing the following in the 3rd stall of my heated garage:
    • Flightscope Mevo+ $1800
    • TGC 2019 $950
    • 9'x11' screen from fabric@worldmarkettrading.com $270
    • 6.5'x10' black photo backdrops for sides $30
    • Custom sewing ceiling protection out of Harbor Freight moving blanket $15
    • METechs screen motor (sides & screen use 1 motor together) $250
    • BenQ TH671ST 1080p projector $700
    • Custom gaming desktop $500
    • 65" Vizio HDTV Already had
    • 25" monitor Already had
    • 19" monitor Already had
    • Custom game control box $50
    • GoSports 4'x5' hitting mat $150
    • Putt-A-Bout 3'x11' putting mat $50
    • 11'x12' cheap green carpet $50
    • Genie wall mount garage door opener $400
    After you add taxes, it was less than $5,800 total. I might have missed a couple little things but know I was below $6k for sure.

    It took some time but was a lot of fun to build. I wanted to do it this way so I could simply click a button, lay my hitting mat against the wall, and pull my truck inside (takes less than 1 minute). I could not be happier with the results.
    Last edited by Clubrepair; 02-08-2022, 04:29 AM.

  • #2
    Great job! I have been working on the same thing. I have gotten hung up on how I'm going to engineer the screen - the tubular motor and rollers. Did you use just use one motor and join the other two sections with a 90" joiner? What size roller tube did you use?

    Comment


    • #3
      Originally posted by mwnold View Post
      Great job! I have been working on the same thing. I have gotten hung up on how I'm going to engineer the screen - the tubular motor and rollers. Did you use just use one motor and join the other two sections with a 90" joiner? What size roller tube did you use?
      That was the most difficult thing about the entire build and I did use 1 motor with the 90* joiners. I got the this one https://www.metechs.com/store/index....ucts_id=416531 but to be honest, it's not as beefy as I'd like.

      The issue you run into with doing all 3 on the same motor is how fast each one rolls up and down (think of how far different wheels travel depending on their circumference) . The sides will be the same, but the screen is different. My screen was much thicker than the sides so I wrapped the side tubes using leftover screen material. It was a bunch of trial and error to get it right, but I did it.

      I also used 2" PVC pipe instead of the tubing METech had because shipping was outrageous. To make the PVC work, you must wrap the part of the motor that turns with something like electrical tape to slide inside for a snug fit. I actually used Harbor Freight self bonding tape (https://www.harborfreight.com/10-ft-...ape-61414.html). You then need to measure and drill through the PVC into the part that turns to "pin" them together. It's not that hard once you understand the principle.

      The reason I said to get a beefy motor is because of weighting the sides and screen. I have 6.5' side walls with a 1x2 in the bottom pocket to weight them down. The motor works fine up and down with those. When I add a 1x2 to the screen, the motor doesn't have enough poop to pull everything. My solution is to just add the screen 1x2 when it' down but to be honest, I really don't need it in the screen I used.

      To take things a little further, I added a total of 4 recessed floor anchors so I can make the side and screen very tight if I want. I made my 1x2s are a little longer on each end so I could drill holes through them and insert bolts into the floor. The screen 1x2 sits on top of the side 1x2s so 1 bolt goes through the screen and sides to hold down. The only time I'm going to bolt things down is when I have people over or plan to have everything set up for a while. Do you need to do this, no, but I did just in case because I'm an idiot that over engineers everything!

      The easy way to do it would be to buy 3 seperate motors and tubes from METech. You could get away with the lighter duty on the sides for sure and possibly the screen as well. Hope this all makes sense and be sure to call and talk to the guy at METech as he was a ton of help.
      Last edited by Clubrepair; 02-07-2022, 07:48 PM.

      Comment


      • Llangm211
        Llangm211 commented
        Editing a comment
        Thanks for sharing the build, I'm on the same path.

        You mentioned weight being an issue with the three linked together, can you say what drive motor you are using? Is it the heavy duty one?

        Also, for the corners where the sides meet the front screen, are they attached to each other after roll down? Any issues with balls going through the corner?

        Thanks!

    • #4
      Thanks for all that great info. I have exchanged some emails Metechs. I'm on a budget and trying to keep costs down by getting used items. But that makes more challenging trying to piece all the crowns, adapters, idlers, brackets, etc....And like you I'm looking at other sources for the roller tube. I like your PVC idea but will be 16ft wide and it would probably sag. A local awning company said they have some old ones they could sell me. I can see the issue with having just the one motor. I will just do the main screen first and then add on the sides later. Being 16 ft wide I might not need them. The only need would be for light control. I watch your video of the screen coming down and didn't see much loss of brightness vs the garage door.

      Comment


      • #5
        Looks good. enjoy sim golf.

        Comment


        • #6
          I just went out and took some pictures to see if that would help. I turned 1 end of the the couplers around on the 90* (have to take off snap ring) so it would work how I wanted, but I'm sure there are many other ways to do it.
          Last edited by Clubrepair; 02-07-2022, 08:16 PM.

          Comment


          • #7
            Looks great, love that you were able to DIY a great sim room for under 6k! Well done!

            Comment


            • #8
              Originally posted by jerry3 View Post
              Looks great, love that you were able to DIY a great sim room for under 6k! Well done!
              Thanks. I could have shaved $1500 off the cost if i were to just use the IOS E6 free software, but I don't use Apple products. I considered finding a used ipad but decided to go all the way with it and use a desktop with TGC2019. No regrets!

              Comment


              • jerry3
                jerry3 commented
                Editing a comment
                Yeah tough to pick where to save, but i imagine tgc is better than e6. Glad you're enjoying the sim, a lot of great times ahead!

            • #9
              Great build!! Working on something similar like that. Have you considered using EMT conduit instead of PVC?

              Comment


              • #10
                Originally posted by Betterthanless View Post
                Great build!! Working on something similar like that. Have you considered using EMT conduit instead of PVC?
                Unfortunately 2" EMT did not fit correctly either and was much heavier than PVC. I have no sag with a 9'ft distance, which is good, but any further and it definitely would.

                Comment


                • #11
                  Good to know about the PVC. I was planning to use 2 inch EMT Conduit on the side screen motors that would be 8 ft, but since you had no issues with sagging with 9ft then that would definitely save me a lot of money.

                  Comment


                  • Daniel.Armenio
                    Daniel.Armenio commented
                    Editing a comment
                    Word of caution, I used PVC for a frame in my last setup. I hit a wormburner at the bottom piece and it exploded into a million pieces. Not sure if it was just the type of PVC I used but something to consider.

                • #12
                  I appreciate the warning. It's next to impossible for a ball to get to the rollers the way I have everything configured. Someone would have to hit a Phil-flop shank/pull in order to hit the sides, and the front roller is recessed above the top with protection in front as well.

                  Comment

                  Working...
                  X