Announcement

Collapse
No announcement yet.

My UK Double Garage Simulator Build

Collapse
X
 
  • Filter
  • Time
  • Show
Clear All
new posts

  • My UK Double Garage Simulator Build

    POST 1

    Hi

    Some friends persuaded me to post about my simulator build.
    I have posted it all on Twit-X under KevFlamingo, but will try and provide a bit more detail here.
    Hoping to add daily to the story.

    Story started when we decided to move house.duning the 2020 Pando.
    Complicated procedure which involved finding a new house next to my Golf Club, finding a buyer for our house, losing our buyer, getting another buyer, losing our seller, finding another house not near my Golf Club with a big garage that can't be used as a garage, selling our old house, moving into a rental for 3 months and then eventually moving in.

    You are probably wondering about the description of the garage.
    The previous owner built a 25sqm double garage at the end of the garden, there is a track running behind the house but it's narrow, loose surfaced and overgrown to tropical rainforest levels.
    He built the garage thinking that the town planners would allow access through to the next road along... they said no!

    My wife agreed to the simulator plan provided it could also be used as a work from home office and also for entertaining.
    I spent a year putting together a plan and researching all of the components and fittings, then it was time to get to work.

    Worth mentioning at this point that I'm a career office worker, which means I have no useful skills at all.
    I am fortunate in that my group of Golfing friends have some very useful skills and contacts which I shamelessly tapped into.

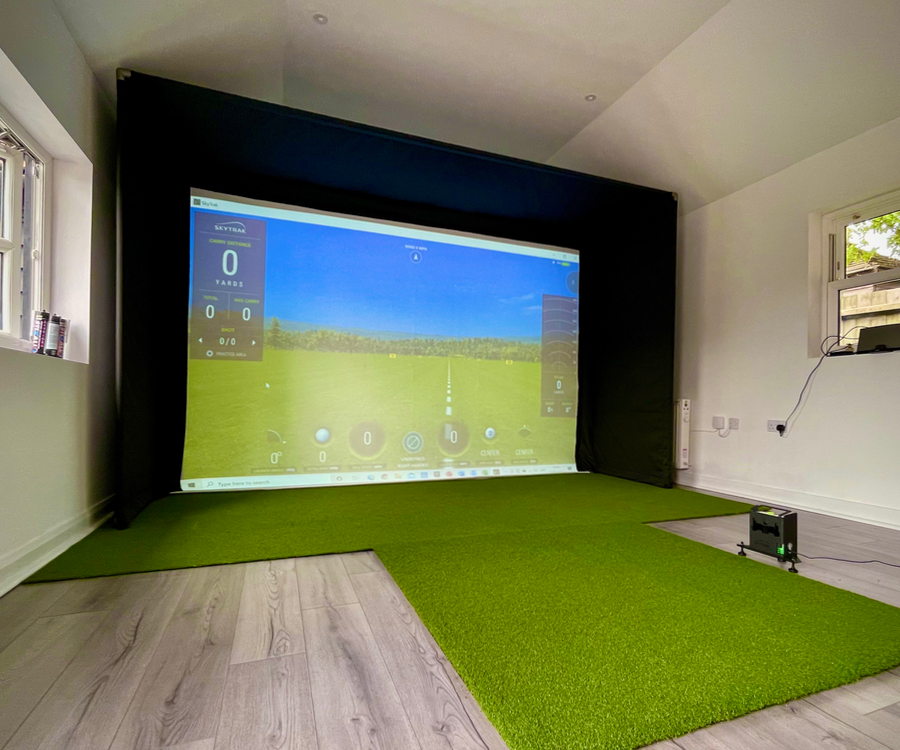
    So the canvas started out like this.
    5m x 5m.
    The 2.4m ceiling is obviously far too low, so that was the first thing to address.

    Click image for larger version  Name:	image.png Views:	21 Size:	283.1 KB ID:	399756


    Last edited by KevFlamingo; 01-09-2024, 06:49 PM.

  • #16
    POST 16

    Washed down the concrete.
    Put down the Gym flooring
    Washed down the Gym flooring - has to be as clean as possible where I was going to use double sided tape to smake sure the artificuial turf doesn't move.
    I put a lot of tape down around the hitting mat to make sure there was was little or no movement as a result of players hitting shots.
    Edges went under the gaps I left under the wall cladding with just enough room to get the edges of the artificial turf under.

    Click image for larger version  Name:	image.png Views:	11 Size:	798.6 KB ID:	400008Click image for larger version  Name:	image.png Views:	8 Size:	125.3 KB ID:	400009​​

    One of my friends came over to help me put down the artificial turf and get it stretched out.
    The very long object you can see is a pack of hitting cage poles which we used as an iron.
    Once the other piece went down thare was only a faint join and a bit of creative vacuum cleaning helps hide this by merging the pile.

    Click image for larger version  Name:	image.png Views:	9 Size:	784.1 KB ID:	400010
    Then came a lot of careful measuring and alignment before i took a sharp blade to the turf and the gym matting underneath to sink in the hitting strip.
    If you are doing this, remember that the only mistake you can get away with is to make the hole too small and then eek out a little extra space.
    I was absolutely delighted with the outcome, just needed a little trimming of the artificial turf overhanging pile after this.

    Click image for larger version  Name:	Capture.jpg Views:	7 Size:	160.2 KB ID:	400011Click image for larger version

Name:	image.png
Views:	740
Size:	728.8 KB
ID:	400032​​
    Last edited by KevFlamingo; 01-14-2024, 04:24 PM.

    Comment


    • #17
      POST 17

      Screen enclosure.


      Wanted the screen to cover as much of the door as possible, but still keeping a bit of storage space.
      Decided to go with an enclosure from GolfinSimulator
      W 3.25m x H2.45m x D 1.45m

      They came back to me to say there would be a delay on the 3.25m, but would I like immediate delivery on a 3.85m screen for the same price?
      I had the space, so why not?

      Professional enclosure -  Super quiet screen - Custom size options What's Included:- Strong Galvanised frame UPGRADED 3 layer impact screen Strong 100% FR Polyester wrap enclosure Foam insert protection Additional options include Custom sizes Branded Simbays Complete Launch monitor and package options


      The kit came with instructions which I safely put away and found 6 months after we put it together.
      Fortunately the combined minds and bodies of a Bank Manager, Structural Engineer, Retired Electrical Contractor and Retired Schoolteacher were able to assemble this in an afternoon.

      I had decided to make some personal upgrades given the quality of player likely to be playing in the sim.
      I obtained thicker foam for the rear uprights and crossbar.
      I also bought a load of bungee ties to mount the screen instead of the very long elastic cord provided, I felt these would be easier to maintain and keep taut.

      I had PGA Pro Tom Duke come along and hit shots with a driver.
      He's over 6ft, has long reach and very comfortably qualifies for membership of the 300 yard club.
      He couldn't hit the Perlins, cage, or get the screen to bulge so much that the ball hit the garage door behind.
      There was also enought give in the screen to make sure the ball didn't spring back into the room.

      First picture is from the GolfinSimulator website.
      Second is my completed version.after further upgrades resulting from initial results.
      Hard wedge shots did spring back into the room, obviously the screen is tighter around the edges so I added some black foam draught excluders.
      We also spent a lot of time recovering tees from behind the cage as the ball impacts seemed to lift up the bottom​ of the screen enough for the tee to fly underneath, so I added the mesh netting you can see at the bottom.

      Click image for larger version

Name:	image.png
Views:	1074
Size:	195.6 KB
ID:	400035Click image for larger version

Name:	image.png
Views:	790
Size:	823.5 KB
ID:	400036​​​

      This is the latest version with anti-shank draft excluders on the uprights and the use of the bungee ties for the screen.

      Click image for larger version

Name:	image.png
Views:	757
Size:	813.6 KB
ID:	400037Click image for larger version

Name:	image.png
Views:	863
Size:	471.4 KB
ID:	400038Click image for larger version

Name:	image.png
Views:	878
Size:	772.2 KB
ID:	400039​​​

      Comment


      • #18
        POST 18

        Launch Monitor & Software

        So much time went into looking at reasonably affordable launch monitor options such as SkyTrack, Mevo, Ernest ES16.
        Skytrack seemed a bit boring and also seemed to be abandond in terms of updates / upgrades due to the lack of competition - something I think has since been rectified - and the annual licence fee is frankly unacceptable.
        The Ernest seemed to be ideal, but the initial problems that forced Ernest to revamp the unit as the ES Tour were off-putting.
        Then came news of the new Full Swing KIT, but a combination of delay and space required behind the player put this out of the frame.
        Then came the possibility of the Bushnell Launch Pro, but this is something that may never appear outside of the US.

        Then there is the software, lots of choice, especially for the SkyTrack, and lots of annual cost unless you splash out on an outright purchase rather than 1 or 2 year licences.

        'Skytrack is is then' I said to my Club Pro, who then pointed out that lots of his colleagues were updating their Foresight GC2s to Quads and therefore there may be deals to be had here on used units. He kindly put out a message on his national buying group message board and very quickly got some offers.

        The best offer was from a Driving Range owner in Scotland who had bought a GC2 (no HMT unit) for a home simulator that he never got around to building.
        It ended up getting some light usage as a back up for the 2 GC Quads in his teaching / fitting studios, had a spare flash, a shield and FR1 software with 96 courses.
        The cost was the same as a new SkyTrack and an outright software licence purchase, so ideal.
        He offered to travel halfway and show me how it all worked, so I drove 4 hours each way on a cold, wet, Winter evening, met up and closed the deal.

        Click image for larger version  Name:	image.png Views:	9 Size:	862.3 KB ID:	400041Click image for larger version  Name:	image.png Views:	6 Size:	842.8 KB ID:	400042Click image for larger version  Name:	image.png Views:	6 Size:	468.6 KB ID:	400043​​​
        Last edited by KevFlamingo; 01-14-2024, 05:54 PM.

        Comment


        • #19
          POST 19

          Tech


          Needed a Gaming PC, looked at the specs to work the software with an eye on upgrading later to FSX 2020, realised how expensive this could get and ended up looking for decent recycled units.
          I found a highly rated builder on eBay called Bedrock Computers who put together a unit for me with the right specs - main issues here are the processor and the graphics card.

          Then came the Projector, TV Screen and Soundbar.

          The projector is an Optoma HD29 HST, 4000 ANSI Lumens - purchased as a discounted ex-display unit - and mounted on an Optoma Ceiling Mount.

          TV and Soundbar are both HiSense purchased from Amazon Warehouse - discounted returned / open box units - mounted on the hard point built into the wall panel (see Post 11, picture 2).

          Click image for larger version  Name:	image.png Views:	1 Size:	764.4 KB ID:	400048​, Click image for larger version  Name:	image.png Views:	1 Size:	802.5 KB ID:	400049

          And once it was all together, it was time to give it a test - First Swing, 11th August 2022.


          Click image for larger version  Name:	image.png Views:	1 Size:	430.4 KB ID:	400050
          Last edited by KevFlamingo; 01-14-2024, 06:53 PM.

          Comment


          • #20
            POST 20

            Other Things


            Heating is important, the garage is detached and you ideally need to protect stuff like the launch monitor, projector and computer from extreme cold.

            I opted for this Warme panel heater, mounted on a TV wall mount that swings well away from the wall.
            It's programmable, so it's set to keep the room a 5C and wi-fi connected so that I can turn it on from pretty much anywhere and preheat the room well before I use it.
            As a back up I also put in a Mylek fan heater over the door.​- wiring since tidied up.

            Yes, there is a beer fridge, Subcold.
            Small Ikea desktop the fridge and keyboard stands on was mounted on hard points build into the wall panels in the corner

            Click image for larger version  Name:	image.png Views:	1 Size:	573.7 KB ID:	400186Click image for larger version

Name:	image.png
Views:	769
Size:	193.1 KB
ID:	400197Click image for larger version

Name:	image.png
Views:	881
Size:	208.1 KB
ID:	400198​​​​​
            ​​
            Fold down desk was mounted by the window with spotlights above.
            Speaking of the window, a good blind is required to keep light out and get the best from the projector.
            Also got a blind for the window panel in the door, this one is more lightweight as there is not a lot of sunlight on this side of the building.

            Click image for larger version  Name:	image.png Views:	1 Size:	579.8 KB ID:	400190Click image for larger version  Name:	image.png Views:	1 Size:	354.6 KB ID:	400191Click image for larger version  Name:	image.png Views:	1 Size:	533.4 KB ID:	400192

            Dartboard, this has proved really popular for family gatherings.
            Full Target set up, board, wall mount, LED light ring and surround.
            Also have a laser projected Oche (toe line) mounted below the board, and later below a shelf which was mounted between the board and the laser following some near misses!

            Click image for larger version  Name:	image.png Views:	1 Size:	814.3 KB ID:	400193Click image for larger version  Name:	image.png Views:	1 Size:	674.1 KB ID:	400194Click image for larger version  Name:	image.png Views:	1 Size:	824.9 KB ID:	400195

            Storage and seating.
            Some room at the side of the screen enclosure for storage, covered off by a shower curtain.
            Also 2 storage chests / seats, pleanty of room inside and can take 2 full grown adults each sitting on them.
            Added bench seat cushions for comfort.

            Click image for larger version  Name:	image.png Views:	1 Size:	862.4 KB ID:	400196
            Attached Files
            Last edited by KevFlamingo; 01-16-2024, 08:29 PM.

            Comment


            • #21
              POST 21

              Finishing Touches

              A Mizuno Den Caddy to store balls and a Mizuno Pencil Case to store tees.
              I quickly realized that it would take a lot of balls to fill the den caddy, so I bought polystyrene cake blanks to fill the bag up to halfway, then added 6 dozen Vice Pro balls I bought during a 6 for 5 offer.
              By the way, I only went with Vice balls because they offered the combination of value and performance I needed due to the excellent bulk discount available, but I am now fully converted and use the Vice Pro Plus on the course. They are genuinely as good as anything the major manufacturers produce.

              BirTees
              Got them from Amazon, not cheap but I’ve used the same pack of these for 16 months and they still show no signs of wearing out.
              These are much better than having lots of normal tees flying everywhere and littering the space.
              The tallest tee was far too tall, so I cut it down to the same size as the one I use the most.
              They come in 8 sizes and loads of different colours. You can get a pack of 8 with all the different sizes and the individual sizes are are also available in smaller packs.


              Putting Cup
              Right from the outset I had decided to sink a cup (maybe even 2 cups) into the putting turf / gym matting, and shallow cups are available.
              I then went to the Bunkered Golf Show and the large putting green area had loads of a product called a Groovefix Carpet Cup placed around the green to aim at.
              These are brilliant, they are sturdy, will catch everything that a normal hole will but will reject putts hit too hard and those that would lip out, and you can put it anywhere you want.
              A couple of friends have bought one after trying mine.

              Practice putting at home in the office hotel room or on the practice green with GrooveFix s Carpet Cup Made from hi grade aluminium that has been


              Click image for larger version

Name:	dataurl126195.png
Views:	801
Size:	488.0 KB
ID:	400399 Click image for larger version

Name:	dataurl126205.png
Views:	1028
Size:	360.1 KB
ID:	400397 Click image for larger version

Name:	dataurl126184.png
Views:	813
Size:	585.2 KB
ID:	400398


              Click image for larger version

Name:	dataurl126217.png
Views:	713
Size:	804.0 KB
ID:	400400


              Comment


              • #22
                POST 22

                My wife decided that the exterior of the former garage needed some brightening up, so she arranged for a London based street artist called Nightways to come and do something about it for my birthday. The result is spectacular.​

                Comment

                Working...
                X