Announcement

Collapse
No announcement yet.

Curved Screen Frame

Collapse
X
 
  • Filter
  • Time
  • Show
Clear All
new posts

  • Curved Screen Frame

    Hi all,

    Long-time listener, first-time caller. Thanks in advance for the assistance. I'm moving my sim from the garage to the basement for numerous reasons and want to take it to the next level with a curved screen. I have enough space (17Wx18Lx9H) to do a 16:9 format and have already confirmed my short-throw projector will support it (according to the manual anyway).

    Can anyone help me locate an off-the-shelf curved screen frame kit? Or, if you have tackled it as a DIY, mind sharing the recipe for the secret sauce?

    I've only been able to locate a couple of "kits" online. The first one on Amazon doesn't give me a lot of confidence:


    This next one seems like it might work, but have some concerns:


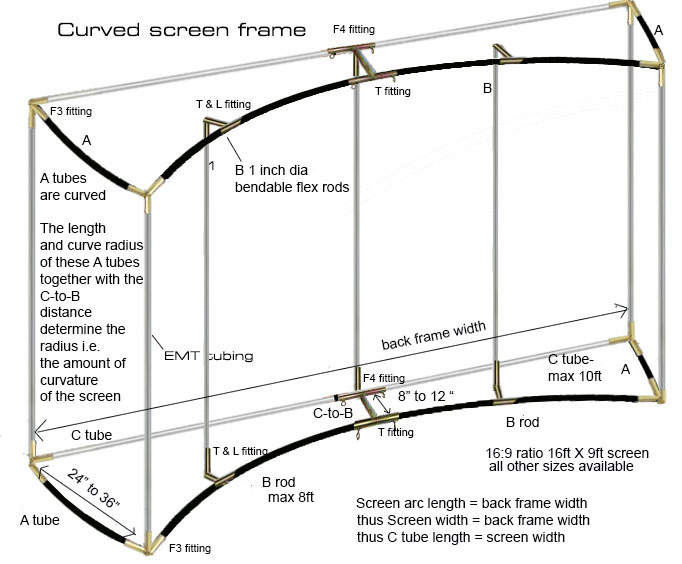
    The physics of how the curves will actually turn out has me scratching my head. I'll likely have to use carriage bolts and nuts to secure the curved parts so they don't rip apart. I'm also concerned about the overall stability of the structure and sag. I'd like to put as few holes as possible in the drywall. Free-standing would be ideal, but a couple of anchor points would be fine. Perhaps two kits would be worth it to add some additional vertical and horizontal cross members?

    Another question. PVC or nylon rods for the curved parts? I found these options:

    We sell, cut, and machine Nylon Sheet and Rod - cast and extruded

    Commonly used in the fabrication of components such as nuts, bolts, washers, and spacers, polyvinyl chloride (PVC) square stock can be re...

    The Nylatron® GS Molybdenum disulfide-filled nylon offers improved strength and rigidity. Note: Lengths 8' and longer must ship v...


    I plan on buying the impact screen separately and appears Carl's place offers a pretty nice premium version with grommet holes, but open to suggestions there, too.

  • #2
    Originally posted by SpaceCowboy View Post
    I've only been able to locate a couple of "kits" online. The first one on Amazon doesn't give me a lot of confidence:


    This next one seems like it might work, but have some concerns:


    I may be wrong, but I'm fairly certain the second picture is the exact same thing as the Amazon kit... Love the idea though! I've always thought Alex Etches has the coolest sim on YouTube with his curved screen. I'll be following along.

    Comment


    • #3
      If I recall correctly the Aboutgolf cured screen (I believe Alex uses about golf) requires 3 projectors. Perhaps reach out to him on YouTube to see.

      Comment


      • #4
        Thanks for the info. I sent Alex an email requesting details on his setup. I've been doing a TON more research on the subject. Appears that although my projector *may* support a curved screen, probably will not give the best picture in terms of overall focus, perspective and brightness. Looks like I may be in the market for a new projector and some warping software. I'm going to try my current projector and if it doesn't work, try the software route and finally, give into a new projector or two if all else fails.

        I'm stubborn and on a mission to crack this nut one way or another...

        Regarding the frame, looks like I can get the DIY connectors from Carl's and make a go of it. Stay tuned...

        Comment


        • Dax
          Dax commented
          Editing a comment
          Wish you luck!

      • #5
        Quick update: I have all the parts required to start my build and just need to modify some 90° fittings to 60° for the left/right corners that start the curve. I'm working with a friend-of-a-friend welder tomorrow to get this done and then I can start building. If successful, will post a full PDF write-up for those interested in doing the same along with some tips learned along the way during my research. So far, the biggest takeaway is this can be done with a single projector as long as your build meets the following conditions:
        • The central angle of the arc is less than 90° and ideally, less than 70°. Anything more than 70° and the edge focus-loss becomes more and more noticeable.
        • The resolution of your projector must exceed the actual resolution you desire, specifically the vertical resolution since that is where the "warping" of the image will occur. Basically, buy a 1920x1200 instead of 1920x1080 projector or, if you can afford it, go with a 4K projector (I'm going with the BenQ LK953ST).
        • Alternatively, you can buy a projector that has built-in warping (aka geometric correction) capabilities. However, based on my research, they are pricey due to the special lenses and not worth it.
        I may or may not need warping software based on my set up. The central angle is ~70° (13' radius, 15' arc length, 2' depth), which may be enough to use the built-in correction functions on the projector and not degrade the image enough to be noticeable since it is 4K. Stay tuned for more updates and pics!

        Comment


        • #6
          I'm hesitant to call this a complete success just yet, but here are some in-progress pics:

          http://www.strategagroup.com/files/GolfSim

          If there's interest, I'll post a write-up on parts required, cost and some lessons learned. It cost roughly $1,600 but $1,000 of that was the 8.5x15 premium impact screen from Carl's.

          I did end up needing warping software - Immersive Player Pro is what I used. $130.

          It still needs baffling/padding, but I've hit over 100 8-irons into it and so far, is holding up very well.
          Last edited by SpaceCowboy; 03-12-2021, 10:10 PM.

          Comment


          • Dax
            Dax commented
            Editing a comment
            Looks great!

        • #7
          WOW That looks incredible! Great JOB! I think you found your NEW calling! I can imagine you WILL be getting plenty of instant messages and emails looking for direction! help and hints on how you did it! The pic on the screen looks AMAZEBALLS! Damn I'm JELLY! Again GREAT JOB!

          Comment


          • #8
            Originally posted by SpaceCowboy View Post
            I'm hesitant to call this a complete success just yet, but here are some in-progress pics:

            http://www.strategagroup.com/files/GolfSim

            If there's interest, I'll post a write-up on parts required, cost and some lessons learned. It cost roughly $1,600 but $1,000 of that was the 8.5x15 premium impact screen from Carl's.

            I did end up needing warping software - Immersive Player Pro is what I used. $130.

            It still needs baffling/padding, but I've hit over 100 8-irons into it and so far, is holding up very well.
            Absolutely amazing job with your build!

            I for one am VERY interested in learning more about your project, how it's holding up, and seeing any updated further progress pictures since your last update. I am considering a very similar build and would be very grateful for any tips or things to watch out for...or even to talk me out of the idea and just go with a traditional screen. If you were able to provide the parts list that would be great.

            Thanks in advance and look forward to your response.

            Mark

            Comment


            • #9
              I have commented before and still in AWE of this! I am currently hitting into a Net return with sim screen and cover, but I have ordered my material for a straight screen but am not to committed yet! I really want to do THIS! I asked a question in this enclosure forum about what I needed behind the hitting screen, I was planning on a Carl's Premium 9 X 11 screen, and I asked the question about what is needed behind the hitting screen, whether its a netting or archery screen to help and I received comments that Carl's you did NOT need anything! I was somewhat confused! I had also read about this Photo Screen that they put in front of the hitting screen that makes the image even BETTER!. So was planning on doing that.

              What's your opinion on putting something behind the impact screen? It sounds like you will be doing something.

              If I recall you are doing the image with one projector, and using this "Warping" software. can you elaborate on this abit!

              I have the BenQ TH671ST projector, would you think this would be capable of doing what I need? If not I think I will have to stay with the flat screen.

              Thanks for the info!

              Comment


              • SpaceCowboy
                SpaceCowboy commented
                Editing a comment
                The warping software aligns the projected image to the curved screen. Assuming you have the projector mounted on the ceiling, the image will be mostly good at the top from the start but the image at the bottom will be on the floor instead of the screen. The warping software (or hardware - see my other post from today) adjusts both the vertical and horizontal image to proportionally fit the curve. It does this by shifting where the pixels are displayed and as such, you lose some resolution. If your projector is 1920x1200, should be good as the final resolution would be ~1800x1080. However, if you're projector is already 1920x1080, you're going to end up somewhere around 1800x900. The more aggressive the arc, the more resolution you'll lose - basically, the software hides the "overshoot" pixels (which you lose) and remaps the other pixels to proportionally align to the arc. I've never tried using a photo screen on top of the impact screen but if you get the high-end impact screen from Carl's looks pretty darn good already.

                You can always try it if and if you don't like it, simple enough to swap the modified fittings with regular one's to create a rectangle (or buy a 4k projector )

                I recommend you have 12" minimum between the front and rear of the frame. If you have this, you don't really "need" anything behind the screen but I did put up two layers - a thick, black drape and memory foam sewn to a layer of fabric at the top so I could attach it to clips to hang from the frame. This serves to minimize the amount of bounceback and the black drape also gives you better image contrast. You have to keep the tension pretty taut with a curved screen to avoid sag. Without the layers, balls will rebound pretty forcefully and might hurt ya! You don't need to use memory foam but it does a fantastic job of absorbing/dispersing energy. Thick moving blankets would also probably work pretty well, too. You also don't need it to cover the entire hitting screen, just mostly where balls are hit. For mine, the black drape covers the entire screen to make the image contrast as good as possible, but the memory foam has ~1' gaps on the right, left, and bottom. You only need to attach it at the top - you want it to "float" there and not be tensioned. Hope this helps!

            • #10
              Originally posted by SpaceCowboy View Post
              I'm hesitant to call this a complete success just yet, but here are some in-progress pics:

              http://www.strategagroup.com/files/GolfSim

              If there's interest, I'll post a write-up on parts required, cost and some lessons learned. It cost roughly $1,600 but $1,000 of that was the 8.5x15 premium impact screen from Carl's.

              I did end up needing warping software - Immersive Player Pro is what I used. $130.

              It still needs baffling/padding, but I've hit over 100 8-irons into it and so far, is holding up very well.
              SpaceCowboy great looking set up - quick question about warping software. Does curved screen mean all output from pc (sim software, HD/4K movies etc) to projector is all fed through this software automatically or do you have to select this in the warping software set up. I am keen to use screen for both sim use as well as movies/sports tv etc in theatre mode.

              Wondering if you need to set up the software once and/or whether it picks up and handles various content outputs automatically. Thanks

              Comment


              • SpaceCowboy
                SpaceCowboy commented
                Editing a comment
                Yep - will warp any content from your PC automatically. When configuring the warping, it is very important to align the grid correctly. I did this by running a piece of masking tape along the bottom of the screen where there is vinyl (you don't want to leave tape residue on the screen itself). Mark the ends with a pen then take the tape off and lay it on the floor and divide/mark it into equal parts, then reattach to the bottom of the screen and use a laser level to align each grid point. Then repeat for the vertical grid (tape along the right or left side). If you attempt to do this 'by eye', which I did the first time, you won't be happy with the end result. The image will be skewed and not proportional along the length of the arc. It takes a bit of time but is worth it. I recommend you divide into equal portions based on the number of feet (mine was 8.5x15.5 so I used a 9x16 grid). You can do fewer, which will save you some time, but, worth it in the end. You can also buy an add-on for the software that allows you to use a USB camera to auto-configure the warping. If you don't have a laser level that does both vertical and horizontal lines, might be worth the additional cost versus buying a laser level.

            • #11
              Sorry for the delay guys. Between work and the sim build, haven't had a lot of free time. I need to take some updated pics. I went down the rabbit hole a bit more and ended up cutting out 2 joists in the ceiling to give me another 8" of swing room. I'm hoping to post updated pics early next week but that may be overly optimistic...

              As far as parts, will also be creating a PDF that lists all the parts required and links to buying them for those interested. That will likely won't be done until mid-June. High level, you can buy the parts from Carl's for the frame fittings here: https://www.carlofet.com/shop/fittin...ipe-connectors

              Quantities for each below:

              F3: 8
              F4: 2
              FT: 2
              FTA Hinge: 8

              You'll need to modify four of the F3's to match the starting angle of the arc (mine was 62°). If you have a friend with a welder, just cut the leg off, grind down to fit the angle you need, and weld back on trying to keep everything going up/down and back still as square as possible. A little variation is okay - doesn't have to be perfectly square as there is a little play in the EMT piping that will snug up once you get the impact screen attached. The hinged fittings keep the arc flat after the impact screen is installed. Since the nylon is flexible, it is great to create the arc but it also want to curve up from the bottom and down from the top when tension is applied from the impact screen. You can see in this pic how the hinged fittings are installed: http://strategagroup.com/files/GolfSim/IMG_6736.jpg

              You'll also need 1" natural (white) nylon rod to create the top/bottom arcs and 1" EMT piping for the rest of the frame which you can get at any big-box DIY store. You can actually go with 1.125" nylon rod if you want a little more stiffness as the fittings will accept that size. I may go with that when I eventually have to replace the impact screen (hopefully many years from now). I was able to find the nylon rod at a local plastics distributor but you can also buy online.

              I ended up going with a hardware warping solution: GeoBox UD101L https://www.vnstw.com/ptslist.php?catid=71

              Immersive Player Pro worked fine but I didn't care for the fact that it also warps the monitor display. Evidently, when mirroring displays, the software can't be configured to warp only the projected display. The GeoBox was $900 with shipping/tax so a bit more expensive but worth it in my opinion. It can also do picture-in-picture which I haven't tried yet but plan on hooking up my Apple TV to it so I can watch sports while hitting balls.

              More to come...

              Comment


              • Jaysim
                Jaysim commented
                Editing a comment
                I'm new here and reviving an old thread. SpaceCowboy - your curved screen looks awesome. I'd like to build a curved screen just like this and this is super helpful. One question I have is what is, I know you're using a 15' wide impact screen, but can you tell me the dimension straight across left to right, edge to edge without the curve? Thanks!

              • SpaceCowboy
                SpaceCowboy commented
                Editing a comment
                Hi Jaysim - so sorry for the delay. I must have missed that a new comment was posted and somebody else PM'd me today. The final width was 14'2". I used this site to calculate it: https://www.omnicalculator.com/math/...ength:15.33!ft which included adding 2" on each side to allow for bungee straps to attach the screen to the frame.

                You can go with a smaller central angle if you want less width, but once you go less than 60°, any warping solution will start to noticeably distort if you use a single projector.

                Good luck with your build!

            • #12
              SpaceCowboy How well do you like the Geobox UD101L? Trying to decide between hardware and software warping solutions...

              Comment


              • #13
                Originally posted by dw886 View Post
                SpaceCowboy How well do you like the Geobox UD101L? Trying to decide between hardware and software warping solutions...
                So sorry for the delay in responding. I'm guessing you already made a decision and hope you went with the Geobox. I love it and can't say enough good things about it. 4+ years and still going strong. I also love that you can do Picture-in-Picture mode. Nice to be able to watch games while playing a round. It takes some time to get it aligned at first, but once set, works perfectly.

                Comment

                Working...
                X