Announcement

Collapse
No announcement yet.

p3eps Golf Simulator Build - UK

Collapse
X
 
  • Filter
  • Time
  • Show
Clear All
new posts

  • p3eps Golf Simulator Build - UK

    Previously I posted a thread asking where to get an impact screen in the UK. Since then I've had a few PM's from members asking about my simulator build and where I got parts from in the UK. Unfortunately the UK market for golf simulators seems to be non existant compared to that in the USA. I thought this thread might be useful for any UK guys to see what I've done with my garage.
    I'll try and describe what I've done in stages, but as it's still an ongoing project, it will be an ongoing thread!

    Background

    I moved house a couple of years ago into a new build home. I have a double garage, which has a ceiling of 2.85m (9.4ft) high. I've often stood in the garage and swung my golf clubs and thought about putting in a practice net.
    Since discovering that my wife and I are having a baby, I've wondered how much time I'll get out on the course over the next year or two! This seemed like the ideal motivation to get some sort of practice setup in the garage - so that I can hit some balls at the odd times I'll be up throughout the night.
    I wondered how I could measure my shots to see where they went... which started a google investigation launch monitors. That led me to a few gof simulator forums, and ultimately here - where I have learned from the best!

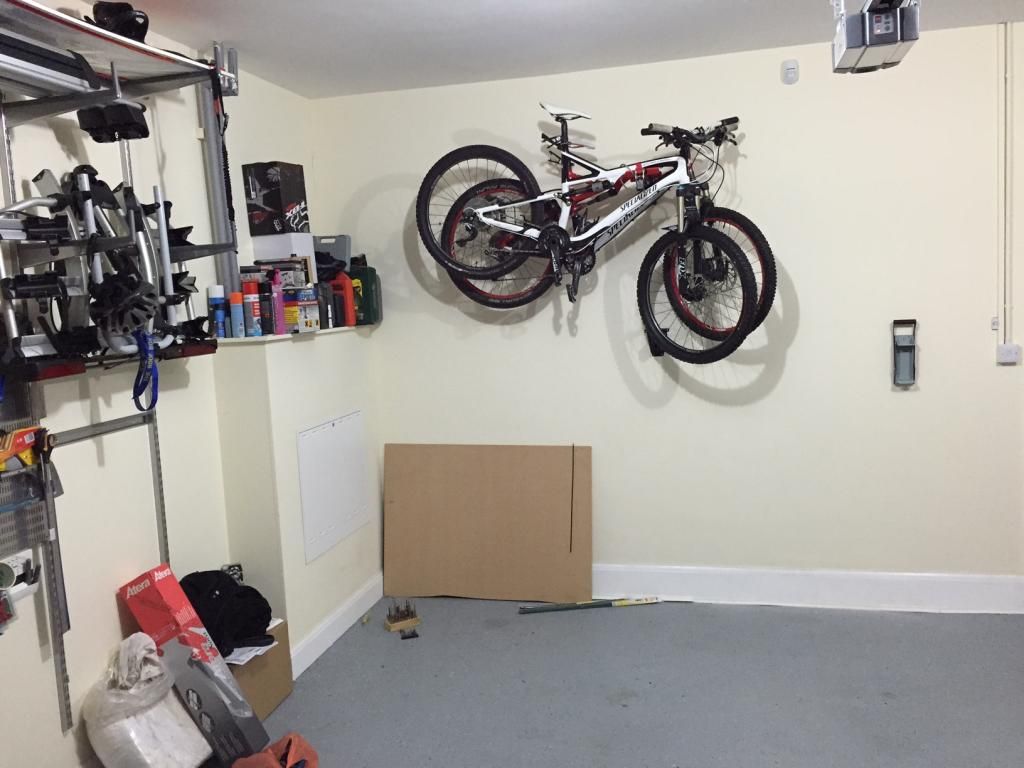
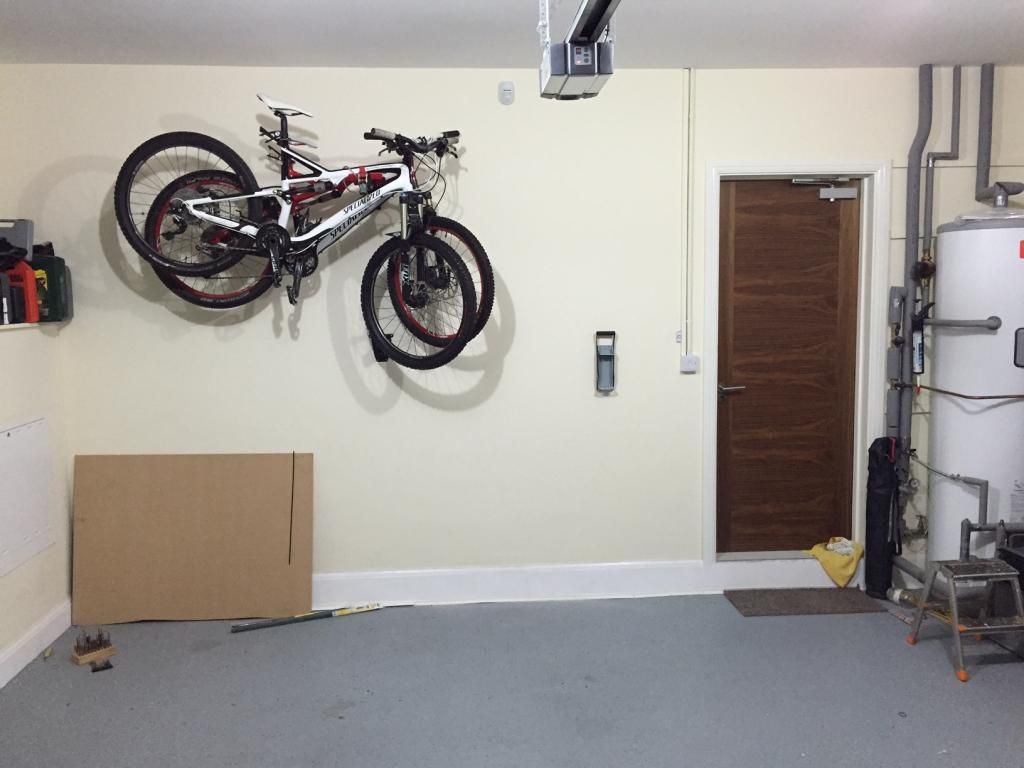
    After my whole thought process being upgraded from a simple mat / net setup to a full simulator, I decided to try and plan out how I could get the best use of my garage. The main issue for me is that I like to put my cars in the garage when I go on holiday - so I wanted something that I could remove / collapse with minimal effort. I also have some existing racking in the garage that I needed to work round, and had a couple of bicycles on the wall which I needed to re-home.
    Being a new build, the garage is all decked out like any other room in the house - with nice plasterboard walls and skirting boards. I needed to make sure that the area was going to be safe from flying golf balls.

    Here are a couple of photos of my garage before I started. Both side walls have things on them, which meant the back wall was the only real candidate for putting a screen on. I wanted the garage to stay functional even when the simulator is set up, so the door had to still be accessible. There is a fridge / freezer and other racking up the right hand side which needed to be accessible too.


    What Type Of Simulator?

    Once I'd convinced myself that I 'needed' more than just a mat and net, I had to figure out what type of simulator was best for me. I needed to quickly be able to make my garage a garage, so I thought a portable launch monitor was the best option. I wouldn't have to worry about cameras being positoned in certain spots, I wouldn't need to worry about a certain type of lighting, and a launch monitor can generally be picked up and put in a corner. My hitting distance to the net is fairly close, so I needed something that could work over a short distance... which ruled out some of the radar monitors.
    I decided on a Foresight GC2, and made enquiries about getting a friend to take one from the USA home to the UK when he came back for Christmas. It was a whole 1/3rd cheaper to do this than buy it in the UK.

    Just when I was away to pull the trigger on the GC2, the SkyTrak announcement was made - so that threw a bit of a spanner in the works. After a bit more research I decided to stick with the 'proven' ability of the GC2, knowing that it would do simulation and work with FSX, TGC and Protee. If I was short of cash, I could use the Foresight iPad app for a while before paying for the simulation software. At this time no one had received a SkyTrak yet, and there were no reviews availble. Although it was significantly cheaper than the GC2, it was an unknown system, and had no form of simulation.
    Foresight USA have a rule where they will only sell a GC2 to a US resident, so I had to get my friend to order it for me using his US credit card and have it delivered to his house. He hand carried the GC2 over to save it getting damaged in his hold luggage.
    Last edited by p3eps; 02-19-2015, 09:36 PM.

  • #2
    Stopping The Ball!

    Once I'd decided on the GC2, the next task was to get some sort of impact net. As mentioned above, the UK simulation market is somewhat non existant. After many evenings of seaching the internet I found XXXXXX company (I'm not mentioning their name at the moment since I'm having problems with them!) who are a UK based company that specialise in golf simulators. I explained that I wanted an impact screen, and also would like some side curtains - to prevent stray balls. After a few emails and phone calls, it seemed I'd found a company that was going to do exactly what I wanted.

    I used Photoshop and drew out the layout I was looking for, and then sent this through with the measurements. After a few more conversations, it became clear that the screen was actually a projection net. They sent me out some samle material of the net and the curtain. Although it wasn't as good as a projector screen it seemed decent enough. As they were going to make this the way I wanted for a decent price I decided that I'd go with the net for the time being. I have an awful habbit of buying things and spending a fortune... using them for a short period... and then not using them again! At least I know the GC2 will sell in the UK for more than I paid for it, so the aim was to not spend too much on the rest until I'm sure I'll use this frequently.

    My setup is essentially a 2.90m x 2.85m net, with a black curtain behind it to hold the projected image. The black curtain extends out of either side of the screen and is the side curtains. I asked for the right hand side to be 2.90m, and the left to be 2.50m. I originally thought about putting the curtains on rails, but decided hooks would be good enough. By having one side curtain the same width as the screen, I could fold it over it to protect the screen when not in use.

    To save space at the back of the garage, the screen would hang from the roof using 'kedar' connectivity. This is essentially a metal rail that attached to the ceiling which has a female groove on it. The screen is made with a male groove on it, and simply slides into the rail.
    I ordered the net / curtains and was advised this would be about 3 weeks until delivered - which it was.
    During that 3 weeks I cleared the wall of the bikes / alarm sensor.

    The first task was to put the rail on the roof. I got 2 pieces at approximately 1.50m each. There were no pre-drilled holes in the rail so that I could make my own holes to line up with my ceiling beams. My ceiling had beams every 60cm, so I drilled the holes and attached the rail to them at approximately 40cm (16") from the wall. Having 2 pieces made this much more managable, but meant I had to be extra careful to make sure they lined up with each other.


    The next task was to get the material into a managable shape and size for sliding it into the rail. Having 2.50m + 2.90m + 2.90m of material was a lot, so I folded both curtains up and used zip ties through their eyelets to keep them in place. I then managed to lift the whole thing up and slide the nets male connection into the rails female connection. The photo below still has zip ties holding the curtains in place.


    As you can see, the screen is way too long. This is what I'm having issues with the company about at the moment. I asked for it to be 2.85m from ceiling to floor (including their connective rail), and it was supplied at over 2.95m. They asked me to test out the curtains before returning it for alteration, as they'd be able to sort anything else at the same time.
    The issue with having the screen too long is... when the ball strikes the net, it moves back. As the screen is dragging along the ground, it doesn't return to it's orignal position. I was advised to try some bungee cords, however, the eyelets were only about 1cm off the ground because the screen was way too long.
    Last edited by p3eps; 02-19-2015, 10:42 PM.

    Comment


    • #3
      Using a combination of cavity wall fixings / hooks I was able to put some hooks in the ceiling to match up with the eyelets in the curtains.


      The curtains were then hung from the hooks. I only used a couple of hooks for each curtain rather than using every eyelet - as I wanted to be able to "close' the curtains fairly easily.


      I used some sewing pins to try and make a temporary hem on the screen for it to sit at a better height. It seemed to work until I hit a low shot which would then knock the pins out.


      Once I'd sorted out the curtains, I put some hooks infront of the screen rail. This meant that I could 'close' the curtains over the screen to protect it when not in use. As the net screen is white, I was scared that I'd put my car in the garage and the dirty bumper would make a mess of the screen if it touched. I also allows me the ability to 'hoist' the whole assembly up towards the roof in future if I need to.

      Last edited by p3eps; 02-19-2015, 10:49 PM.

      Comment


      • #4
        Hitting Mat

        Whilst waiting for my GC2 to be imported and my net / curtain assembly to be manufactured, I decided to get some other bits and bobs ordered.
        The first thing I ordered was a hitting mat. It was ordered from Amazon, and arrived within a few days. I thought it looked great, as it had 3 sections for hitting off. Fairway, rough and heavy rough. It seemed like a great idea...


        It wasn't until the CG2 arrived that I realised the huge error I'd made! As the GC2 is a camera based system, it's looking at a certain area for the ball (maybe a 15cm square). The GC2 auto levels itself when you switch it on, so you can't really move it. This meant I would have to pick one of the 3 types of turf to play off, and stick with it.
        The middle section has a bit for putting a tee in, so I used that - but the turf was too thick for putting. The 'fairway' bit was too short for using a driver on.
        The solution was simple... buy another mat!!

        After doing a bit more research into mats, I discovered you can get ones that simulate taking a divot. I looked at various brands of this, and found SofTee to be availabe in the UK and a reasonable price. I found a UK distributer of them (http://www.rangemastergolf.com/) and contacted them. After a few emails and phone calls, Alistair convinced me that their new Pro V3 mat was way better than anything else at the moment. He sells mats to driving ranges all over Scotland, and had sold one of these Pro V3 mats to Paul Laurie for personal use - who said it was the best thing since sliced bread! I'm sure even you American guys will remember Paul Laurie from his 1999 win of The Open at Carnousite! I thought if it's good enough for Paul to use in his house, then it's good enough for me to use in mine!!


        I orderd the mat, the surround, and a ball tray from him. It wasn't cheap, but it feels high quality. It's got a tee 'hole' in the centre of each edge so that you can rotate the mat. The surround is so heavy, that it's practically impossible to move on your own. Thankfully the grass lifts out relatively easily... and the surround can just stay on the floor and be driven over when I need to collapse my setup!
        It can use the standard rubber tees that you usually get at the driving range, but I got it with the 'new' adjustable ones instead.

        Last edited by p3eps; 02-21-2015, 09:50 PM.

        Comment


        • #5
          Stopping The Ball Again!

          Once the original mat arrived, I quickly discovered another problem.
          When you hit a ball at a screen, the ball drops to the floor. My garage floor is painted concrete, so the balls come down with a bang, Then they bounce all over the place!
          I originally bought some rubber mats, but they were too flexible to be able to pick up and move about. I then thought about getting some of the carpet off cuts I have in my loft. Again, these would be dificult to store when they weren't on the floor.

          I decided to get some cheap wooden boards (MDF) and got 4 boards which were approximately 1.5m x 1.1m. My screen is a little under 3m wide, so I'd lay them out in a 2 x 2 formation. MDF board turns into carboard if it gets wet. It's unlikely it'd get wet in my garage, but I painted it with some waterproof paint just incase.

          I then ordered a roll of 4 x 3m of golf grade Astroturf from http://www.flooringsuperstore.com/. I cut the astroturf into sections, and used it to cover the MDF boards. I attached the turf to the board using lots of industrial staples, and then stapled some old offcuts of carpet to the base of the board to act as soft feet.
          The grass boards can be lifted and placed against the wall with ease. Because they're ony 1.5m x 1.1m they are relatively easy to manouvre, and they take up no space. When everything is in place, I'll be able to tuck them away behind the screen.


          The good news is they work great! They stop the ball bouncing about my garage, and they give the whole simulator a much more professional look!

          Another problem I discovered is how easily a bad shot can go wrong!
          I completely thinned a shot when my screen was still too long (and sitting funny) and the ball went rifling underneath the screen and smashed off my skirting board. The result was the ball flying straight back at me... and a cracked skirting board!! I decided to get a little bit of padding for the wall just incase of another one of these freak shots.

          I bought a set of foam mats that go together like jigsaw puzzle pieces from eBay. I attached them to the wall with some screws and giant washers. Hopefully I won't need them (yeah, right!) but they're there just incase.

          Last edited by p3eps; 02-22-2015, 04:01 PM.

          Comment


          • #6
            Simulation PC

            I'd spent a lot of money on the GC2, so I was wanting to spend as little as possible on the computer. I worked in IT for years before a career change, so I'm familiar with computer hardware. I know that if you want something high spec, then you've got to spend the money - so my goal was to try and get something good enough and not spend a fortune.

            Black Friday sales and eBay helped me get a lot of components at bargain prices. Mainly new stuff, apart from a second hand graphics card.
            My spec is:
            Aerocool Dead Silence Case
            Asus H81M-Plus motherboard
            Intel i5 3.2ghz Haswell Quad Core processor
            Gigabyte Windforce Nvidia GTX760 OC 4gb
            Corsair Vengeance DDR3 2133 8gb RAM
            Corsair CX600M Power Supply
            2TB Seagate Barracuda HDD
            Windows 8.1 OEM

            I've played a couple of rounds today and the computer seems to cope pretty well with TGC so far. I run it on high with the detail level at 3. I noticed a couple of minor stutters when I was taking big putts, but they weren't enough to cause any inconvenience.
            One day I'll buy a top spec graphics card, which should speed things up a bit - but for now, the PC will do me.

            I went with a Hanns G 23" touch screen monitor, and mounted it on the wall. I got a piece of aluminium and bent into a suitable shape - and attached it to the monitor bracket. This gave me a place for mounting the keyboard. I used a Keysonic ACK-540U USB keyboard / touchpad as it was small and works well.
            I put the PC on a shelf - and made sure it was high enough so that it was above my car door. That way if I have 2 cars in the garage (a bit of a squeeze), I can still open the door without worrying about it hitting the shelf.


            Projector

            Once again, I didn't want to spend an awful lot on this. As I'm projecting onto a net screen, I didn't see the point in buying something super high quality. This may be a decision I regret if I buy a ProTee screen - but I got a pretty good deal in the Black Friday sales on the one I got. I don't know if my screen would be big enough that the quality would make a huge difference anyway.
            I went for the Optoma GT760, which has 3400 lumens and is 720p. My main reason for this is that its throw ratio is very small.
            My tee to screen distance is about 10ft, so I wanted the projector to be as far forward as possible. This would save me being in it's shadow, and also save me hitting it with my follow through swing!

            I got a cheap ceiling mount bracket from eBay which did the job.
            Last edited by p3eps; 02-22-2015, 04:03 PM.

            Comment


            • #7
              Putting Everything Together

              Once I'd got everything set up and installed, I was able to figure out exactly how much I needed the length of the screen reduced by. I also asked for the curtains to be modified slightly too. I packed the whole lot up and it was collected by the company for modification. It took 3 weeks, and I re-hung it the day I got it back.
              The screen seemed to be a perfect length - sitting about 1cm above the 'turf'. This lets it 'float' back to its original position after the ball hits it. It was still pretty crumpled and not hanging very straight. The obvious answer would be to attach a couple of hooks to the floor and tie the screen down with some bungee cords. Unfortunately this isn't very simple as I have underfloor heating in my garage, meaning that there are lots of water pipes underneath the concrete. I didn't really fancy drilling a hole into the floor and bursting a pipe!!

              When they took the screen up, they basically folded it up and re-stitched it. This means there is a fairly large hem at the back. I decided to put something inside the hem to weight it down - which would mean it had less movement, and also would hang straighter. I had some heavy duty chain in mind when I went to my local hardware store, but I decided this wouldn't help with keeping the base of the screen straight. I then looked at some broom handles, but these were very light. Whilst walking round the store I stumbled into the plumbing section, and saw they sold piping in 3m lengths. I ended up getting some thick bore stainless steel piping - which I cut to size and put inside my hem. The weight immediately pulled the screen straight.


              As part of my setup I bought a TeeGo ball dispenser (http://www.teego.com/tcpersonal.html). It seemed like a novel way of dispensing balls without spending a fortune. I got it for £16 off eBay, and although it looks like a kids toy, it actually works really well. Fill the container with up to 75 balls, and simply tap the button which releases a ball. It needs to be lined up properly to ensure that your ball lands on the tee, but once it's in place it works great.
              As my hitting mat is fairly plush and in a surround, it's a couple of inches off the ground. This means that the TeeGo needs to be raised to work - otherwise gravity won't pull the arm down far enough. I built a small wooden stand out of some left over MDF which holds the GC2 and the TeeGo. Using some of the left over Astroturf, I covered it to make it look nice!

              I spent a bit of time figuring out the ideal spot for the GC2, and measured to make sure it was parallel to my hitting mat. Obviously the GC2 needs to be completely parallel to the hitting mat to ensure a shot that's hit straight reads straight.
              Once I'd found the ideal spot, I got a couple of gardening sticks for helping sunflowers stand up. I cut them to size, and placed them down the sides of the GC2 - and used some industrial staples to hold them in place. This means that if I take the GC2 away anywhere, I can simply slide it back between these 'rails' and it's back in its optimum position. I put a couple of staples into the rubber surround for my mat so that I know where to re-align my stand after I move it.

              I bought an EyeLine 360 Degree Mirror - which usually sits between the GC2 and the TeeGo. This allows you to keep an eye on your swing without having to take your eye off the ball.


              I spent a lot of time trying to find a way of storing my bikes about a year ago as I wanted to clear that wall. I found a device called Floaterhoist (http://www.floaterhoist.com/) , which was originally a kickstarter project. It looked ideal for my needs, but unfortunately they didn't sell in the UK. I contacted them and asked about a UK distributer and was told this would be happening soon. After a year of waiting, I contacted them again, as I knew had to take my bikes down. I was told again that the UK distributer would be coming within the next month. In January I pleaded with Floaterhoist telling them I was desperate - and they agreed to courier me over 2 units. It took 2 weeks for them to arrive, and the postage cost more than the 2 units!! I put them up on the roof, and the bikes fit perfectly in the space at the side of the curtains.


              I set everything up and have been using it like this for the last few weeks. Obviously the garage door being open has completely ruined the brightness of the projector making it look completely washed out! This setup has a few issues that I'm in the middle of trying to remedy. The updates will follow!

              Last edited by p3eps; 03-05-2015, 10:23 PM.

              Comment


              • #8
                Problems and resolving them

                The first issue became aparent when I badly topped a ball. Having a heavy metal pipe in the screen works wonders for pulling the screen tight, but it's pretty scary when you hit it with a golf ball. The ball came flying back at me at around 100mph (a complete guess) and I had to duck fast! It then bounced off the garage door and rattled around the place! Not cool!! After hitting a few shots like that over the course of a couple of weeks, I decided something needed done. My first thought was to put something round the pipe to soften the blow. I bought some pipe foam insulation from my local hardware store. It cost about £2 for 3m, and I cut it to the same size as my pipe and fitted it over it.
                I quickly realised that this made the issue worse, as the foam made the ball come back faster! The only good thing was I didn't get the scary PING noise!

                I sat and stared at the setup for a while, and had a better idea... I was going to build a ramp!
                I ordered a couple of sheets of Lexan from a local company who specialise in sign writing. Lexan is essentially a shatterproof type plastic material that is flexible. As my grass boards were 150cm wide, I ordered Lexan sheets that were 150cm x 60cm x 3mm. I bought 2 bits of timber from my local hardware store that I cut to 150cm x 80cm x 40cm. I removed the staples from my grass boards and took the grass off completely, and then attached the timber to the boards using some big woodscrews and large washers. I then attached the Lexan to the timber and the board.


                Once the 'ramp' was made, I re-fitted the astroturf using the staplegun. The ramp ensures that any low hit golf balls travel up the ramp and hit the screen above the pipe. The other good thing about the ramp is that I've left 20cm between the top of the ramp and the screen. This is an ideal channel for the golf balls to fall into after they've hit the screen. Because the ramp is higher than the ball, there is no chance of me hitting a 'used' ball with my next shot. This saves me having to collect the ball off the turf before my next shot! It's also handy for putting, as the ball rolls back on soft putts!!


                I had a friend round for a round of golf, and soon noticed another couple of problems. His swing was a bit wilder than mine, and as a result he was clipping my garage door runner with his backswing. A simple fix for this was to pull the hitting mat to the right a little bit. Another solution would be to pull the mat closer to the screen, but the turf layout prevented that.
                He also had a few duff shots where the ball hit the roof.


                I decided to modify the turf to enable me to move the mat forward. The closer the golfer is to the screen, the less chance they have of hitting the roof with lofted irons. I tried a few different positions, and decided I didn't want to move too far forward as this would put the golfer at risk of rebounding balls. Once again, I removed the astroturf from my other 2 boards and cut them a bit. I decided to make them into 'L' shapes so that I could embed the mat in them. Once I had them at the correct shape, I recovered them with the astroturf using more staples.

                Comment


                • Torellion
                  Torellion commented
                  Editing a comment
                  Hiya buddy,

                  I'm (slowly) putting my own golf sim together and stumbled across your post(s) - very interesting & interesting to see we've had a few of the same challenges. One thing I'm curious about - how useful do you find the 360 degree mirror in this picture?

                  My own setup works but I am slowly evolving it as I use it to make continuous improvements. The problem I'm having is that once it works, I spend more time hitting golf balls and less time doing the work I should be doing to make it better ;-)

                • p3eps
                  p3eps commented
                  Editing a comment
                  Since making this thread, I've started again and have completely redone my setup.
                  See this thread here (if you haven't already!)
                  Back at the beginning of 2015, I had a go at turning my 2 car garage into a simulator room. One of the main issues I faced was that I had to have it collapsable...


                  As for the 360 mirror - I don't really use it in all honesty. One of the things I do that I'm trying not to is bend my arm during my backswing. With the 360 mirror, it's difficult to see if it's bent or not as its concaved. I have a full size mirror now that is much better.

              • #9
                For all my stuff!

                Comment


                • #10
                  This should be enough!

                  Comment


                  • #11
                    Looking good p3eps. I would continue looking for a better screen.

                    Comment


                    • #12
                      Originally posted by Zmax View Post
                      Looking good p3eps. I would continue looking for a better screen.
                      Thanks...
                      Once I establish that I'm going to use the golf sim regularly and not get bored of it, I'll invest in a ProTee screen.
                      I've still got a lot more to add to this build thread though - bit by bit!
                      Hopefully when I'm done I can hang the ProTee screen infront of the net screen which will prevent it getting damaged and make it last longer.

                      Comment


                      • #13
                        Yes, that's a great idea.

                        Comment


                        • #14
                          My screen drags on the floor and this helps stop balls from going under. Mine is almost like a shower curtain hung and I slide it back and forth to use. I also use a fiberglass 3/8" rod along the base to pull the base tight and add a bit of weight to the base of the screen.

                          It looks like in your one photo that there are grommets just about at floor level. This is where I would rig up the fiberglass rod. Even a couple wood dowels taped together to get the length might work as well, just not as much weight. I added a wad of tape to the end of the rod so about 3/4" of the end of the rod sticks out on both ends. I wedge the rod into the grommets on both ends (rod needs to be made to be the right length and bow a bit for tension) and it springs the corners so that the base of the screen is tight. This will allow balls to hit the screen and have enough weight to have it fall back into place.

                          Just a thought.
                          Mountain Time

                          Comment


                          • #15
                            Originally posted by SFR View Post
                            My screen drags on the floor and this helps stop balls from going under. Mine is almost like a shower curtain hung and I slide it back and forth to use. I also use a fiberglass 3/8" rod along the base to pull the base tight and add a bit of weight to the base of the screen.

                            It looks like in your one photo that there are grommets just about at floor level. This is where I would rig up the fiberglass rod. Even a couple wood dowels taped together to get the length might work as well, just not as much weight. I added a wad of tape to the end of the rod so about 3/4" of the end of the rod sticks out on both ends. I wedge the rod into the grommets on both ends (rod needs to be made to be the right length and bow a bit for tension) and it springs the corners so that the base of the screen is tight. This will allow balls to hit the screen and have enough weight to have it fall back into place.

                            Just a thought.
                            I've already had it altered - and got it back yesterday. It hangs much better, but I think I need to get something to weigh it down. It has a huge hem at the back of the bottom, so will be easy to slide something inside. I was thinking about some chain from my local DIY store as it would still be flexible, but have a good bit of weight to it? Perhaps something more solid would be better as it would help keep the shape?

                            I have a plan in place to stop the balls going under... but that will come in the next few weeks I think!

                            Comment

                            Working...
                            X