New Build Begun, The Journey Begins, etc...

Collapse
X
 
  • Time
  • Show
Clear All
new posts
  • kdcdds
    Junior Member
    • Nov 2020
    • 18

    #1

    New Build Begun, The Journey Begins, etc...

    Hello All,
    I have been reading this forum for about a year and decided to attempt to "fast track" my build since I have a bit of time available over the next few weeks. Here are the specs:
    1. I had 3 options as to where to build, and I chose the 2 car garage as it has the highest ceilings
    2. Dimensions of 2 car garage are as follows: 9'3" high, 24' across, apps 24' deep
    3. Skytrak and Microbay to be build foundation units

    Order of Project:
    1. Eliminate clutter, tool area, workbench area, etc from 2 car garage and move to 3rd car garage area. 2-3 week process
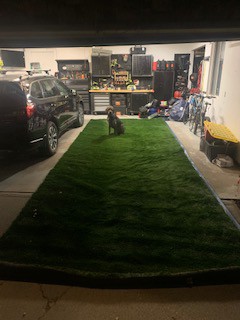


    1a. make 3rd car garage area a workshop area and storage for all things from 2 car garage in hopes of eventually having friends over for entertainment purposes.


    2. Eliminate halogen lights in garage and replace with recessed LED lighting and dimmer. Lighting is same as I used for my basement, and is super easy to install and looks fantastic. $6/fixture. JULLISON LED 12 Packs 6 Inch Recessed Low Profile Slim Panel Light with Junction Box.


    Click image for larger version

Name:	image11 copy.jpg
Views:	3124
Size:	15.2 KB
ID:	305402

    3. Acquire turf area-- artificial grass given to me by a friend that had just used it for an area of a new construction build. turf area rolled up and pulled out and measured in above photo. apps 8' x 24'. so cut in half for 12' width x 8' length.


    4. Screen-- given a temporary damaged screen by a local indoor golf area as Microbay is 4-6 weeks out on shipping.


    5. Skytrak-- of course, new is shipping early February, so i went to their vendor list and just started calling, and found one available at a country club in Idaho that was purchased for their shop but never used. So, was able to buy it from them as "used" for $1400

    6. 5x5 hitting mat purchased from Allturfmats.com , as seen on eBay and amazon, but ordered directly from them. arrived in apps 6 days from ordering. Super Tee Golf Mat - 5' x 5'.https://www.allturfmats.com/Premium-...t-p/tt6060.htm.

    with tray, free shipping, think was around 299 or just under 300. holds real tees and performs flawlessly. really love the feel of this. the grass above that was given to me is more like golf course rough, which is fantastic for putting under screen so it catches and holds all rebounds.


    Click image for larger version

Name:	image10.jpeg
Views:	3108
Size:	20.1 KB
ID:	305401

    7. New Screen 1-2 weeks away: Allsportsystems.com Microbay with premium screen 9 x 12. I will place over existing screen with holes, and create surround. also, have decided that i will hang from ceiling and created a system so i can raise it up and secure it to the roof to do 2 things: 1. get out of way and 2. protect projector. I will connect it to the ceiling with the front of the frame, if possible, so it will fold up to the ceiling the way i have this "temporary" screen done.


    Click image for larger version

Name:	microbay-golf-screen-1-900x675.jpg
Views:	2981
Size:	100.3 KB
ID:	305405
    8. Projector-- BenQ 3200 lumen projector--MW817ST DLP Projector Short-Throw. purchased used on eBay for 175 dollars. is bright and looks fantastic. All cords and wires will be eliminated and tucked into the walls in the next few days, or as soon as i get time. again, screen is just placed temporarily and was given to me for free until new build arrives. I considered the remote option, but it just didn't fit into my budget or desired outcome. this is much less expensive, and will ultimately look and function as well or better. the screen will fold up and attach to the ceiling, protecting the projector, and the turf will easily roll forward into a roll which can be out of the way near the wall.

    Click image for larger version

Name:	image1-5.jpeg
Views:	2894
Size:	13.6 KB
ID:	305404
    9. Computer is a windows 10, quad core business computer with a crappy video card that i acquired from my office, along with a 42" monitor that we were not using.

    10. blackout curtains purchased on amazon, to cover entry into 3rd car garage and window


    Click image for larger version

Name:	image2-2.jpeg
Views:	6172
Size:	14.7 KB
ID:	305397

    11. golf area made in garage to store club things and a club washer which i purchased on amazon.


    Click image for larger version

Name:	image_22048.jpg
Views:	3108
Size:	156.2 KB
ID:	305403

    -- again, holes in screen has caused me to put multiple holes in the wall behind, but i have temporarily remedied that with the turf for a temporary fix.
    -- addition of TGC 2019 will require an upgrade of the computer to a gaming system.
    -- upon final build, the turf will be cut and sized appropriately

    Click image for larger version

Name:	image3-2.jpeg
Views:	3165
Size:	14.3 KB
ID:	305398 Click image for larger version

Name:	image8.jpeg
Views:	3181
Size:	15.7 KB
ID:	305399


    Pros of this setup:
    -- placed in garage so i can get up early, stay out late, etc and won't bother rest of family
    -- garage door an be opened and it can be fresh and airy enviornment
    -- alterations and changes can occur without much expense and too much extra work due to size of space and flexibility of walls, ceiling, etc
    -- can be folded into ceiling and can still be used as 2 car garage.
    -- wife cannot even hear the impact in the house
    Cons of this setup:
    -- cold/hot issues must be solved with space heater or portable a/c unit if necessary
    -- must move car out to use (possibly both cars)
    --possibly going to need to move garage door opener to a side mount garage opener for taller people
    -- others not yet identified

    See photos below of before, during, and current
    Attached Files
    Last edited by kdcdds; 12-21-2020, 03:14 AM.
  • Sixmudd
    Advanced Member
    • Nov 2020
    • 327

    #2
    Originally posted by kdcdds View Post
    Hello All,
    I have been reading this forum for about a year and decided to attempt to "fast track" my build since I have a bit of time available over the next few weeks. Here are the specs:
    1. I had 3 options as to where to build, and I chose the 2 car garage as it has the highest ceilings
    2. Dimensions of 2 car garage are as follows: 9'3" high, 24' across, apps 24' deep
    3. Skytrak and Microbay to be build foundation units

    Order of Project:
    1. Eliminate clutter, tool area, workbench area, etc from 2 car garage and move to 3rd car garage area. 2-3 week process
    1a. make 3rd car garage area a workshop area and storage for all things from 2 car garage in hopes of eventually having friends over for entertainment purposes.
    2. Eliminate halogen lights in garage and replace with recessed LED lighting and dimmer. Lighting is same as I used for my basement, and is super easy to install and looks fantastic. $6/fixture. JULLISON LED 12 Packs 6 Inch Recessed Low Profile Slim Panel Light with Junction Box.
    3. Acquire turf area-- artificial grass given to me by a friend that had just used it for an area of a new construction build.
    4. Screen-- given a temporary damaged screen by a local indoor golf area as Microbay is 4-6 weeks out on shipping.
    5. Skytrak-- of course, new is shipping early February, so i went to their vendor list and just started calling, and found one available at a country club in Idaho that was purchased for their shop but never used. So, was able to buy it from them as "used" for $1400
    6. 5x5 hitting mat purchased from Allturfmats.com , as seen on eBay and amazon, but ordered directly from them. arrived in apps 6 days from ordering. Super Tee Golf Mat - 5' x 5'.https://www.allturfmats.com/Premium-...t-p/tt6060.htm
    7. New Screen 1-2 weeks away: Allsportsystems.com Microbay with premium screen 9 x 12. I will place over existing screen with holes, and create surround. also, have decided that i will hang from ceiling and created a system so i can raise it up and secure it to the roof to do 2 things: 1. get out of way and 2. protect projector
    8. Projector-- BenQ 3200 lumen projector--MW817ST DLP Projector Short-Throw. purchased used on eBay for 175 dollars. is bright and looks fantastic.
    9. Computer is a windows 10, quad core business computer with a crappy video card that i acquired from my office, along with a 42" monitor that we were not using.
    10. blackout curtains purchased on amazon, to cover entry into 3rd car garage and window
    11. golf area made in garage to store club things and a club washer which i purchased on amazon.
    -- again, holes in screen has caused me to put multiple holes in the wall behind, but i have temporarily remedied that with the turf for a temporary fix.
    -- addition of TGC 2019 will require an upgrade of the computer to a gaming system.
    -- upon final build, the turf will be cut and sized appropriately
    Great deal on the skytrak! What’s your wiring like?

    Comment


    • kdcdds
      kdcdds commented
      Editing a comment
      wiring is currently exposed. but here is my plan moving forward:
      1. wire a dedicated 2" recessed spot light down onto hitting area and run to switch on wall beside other 2 light switches.
      2. run hdmi and power cable to projector in the ceiling and down the wall to the computer
      3. mount computer on wall below monitor
      4. run hdmi and power to monitor on wall inside of wall
      5. place a fold up keyboard/mouse mount on the wall for wireless setup.

      I just did all of this very similar wiring at my office for a CT machine that was just installed and it was really easy. just gotta fish the wires and perhaps make a small cut in the ceiling and wall where they join which is easily patched and repaired.
  • kdcdds
    Junior Member
    • Nov 2020
    • 18

    #3
    Attached Files

    Comment


    • Nugget
      Nugget commented
      Editing a comment
      Great set-up. I too spent the last several weeks setting up half my garage for an 8x8 screen. Lots of time spent re-organizing the mess in the garage and putting in a heater. Had to run a 240v line to garage for that. Also added insulation to ceiling to reduce cold from top. Maybe I will post some pictures here soon.
  • kdcdds
    Junior Member
    • Nov 2020
    • 18

    #4
    Click image for larger version

Name:	BE9CD8BB-B563-4622-B41D-DD543ED6C656.jpeg
Views:	2755
Size:	96.0 KB
ID:	305409 Click image for larger version

Name:	4B47519D-6BE2-4014-869D-E9BB24DA20C7.jpeg
Views:	2990
Size:	76.2 KB
ID:	305410 Click image for larger version

Name:	8283B0C6-FCDF-4174-9460-385F3A942E66.jpeg
Views:	2759
Size:	96.0 KB
ID:	305411
    Attached Files

    Comment

    • Godfather
      Super Member
      • Dec 2015
      • 516

      #5
      Looking good!

      Comment

      • kdcdds
        Junior Member
        • Nov 2020
        • 18

        #6
        Click image for larger version  Name:	F76BD5CA-34E9-457B-B8EB-EDC4D553D137.jpeg Views:	0 Size:	52.4 KB ID:	307220 I have some updated things I have done to my build:
        1. I cleaned up the side wall a bit
        2. ran wires in the side wall
        3. built collapsible shelf for keyboard, mouse,
        etx
        4. built a computer shelf thst also folds down
        5. added a gaming computer
        6. added TGC 2019- problematic download but finally working
        7. Added digital dimmer to garage to dim lighting
        8. added velcro strip for hanging of misc. remotes and accessories (gloves, etc)
        9. added golf trash can, but will use it for extra clubs, etc as shown.
        10. add outlet behind computer in wall to eliminate extention cord wiring

        things left to do:
        1. add new screen and surround once it arrives
        2. finalize mounting of projector to new screen
        3. add 3” downlighting to ceiling for swing area
        4. finalize turf area once new screen is built
        5. hide all visible wires once all things are in their final resting place (including all wires behind the computer in the picture


        Click image for larger version  Name:	E6DA3611-A267-4DD5-916B-3D428E8C06FB.jpeg Views:	0 Size:	167.5 KB ID:	307219
        Gaming Computer Specs:
        Intel i& 8700 3.50Ghz
        16gb ram
        AORUS GeForce GTX 1080 Ti 11GB Graphic Card
        500gb ssd


        Last edited by kdcdds; 12-28-2020, 05:37 PM.

        Comment

        • kdcdds
          Junior Member
          • Nov 2020
          • 18

          #7
          OK, now i need some advice, help, info. I just downloaded TGC 2019 and i cannot putt. also, i have a new screen and surround coming from allsportsystems.com.
          My question is regarding turf, putting on tgc, and flooring
          here is what i have at my disposal:
          2x 12 x 6' super expensive, tall, artificial grass. see original photo with my dog. this has been cut into half so 2 12'x6' pieces
          1 5'x5' hitting mat as shown in photo
          1 5/x10' hitting mat on order, exact same as 5x5.
          my thoughts are as follows: tall artificial grass is fantastic for catching balls and eliminating return shots skulling back at me, but impossible to putt on. so i am thinking of using appx 2-5' of it under screen, and cut it out for the following
          5x5 hitting mat next
          5x10 laying across for right/left handers.
          that would give me apps 7' of putting surface. is that enough? for skytrak, how much putting length is needed or ideal?
          projector is short throw and at about 6' and i am currently hitting from about 6-8' away.

          Comment

          • Shankz
            Advanced Member
            • Feb 2020
            • 344

            #8
            What is the reason you can not putt? Is it a turf issue or a hardware/software issue?

            Comment

            • kdcdds
              Junior Member
              • Nov 2020
              • 18

              #9
              I cannot putt because the turf is currently as follows: 5x5 mat and then artificial grass which is really tall, so ball hits it and stops. if i seperate the two, ball putts off of mat, hits concrete garage floor, and goes 25' on a 4' putt, due to the irregularity of the surface and possibly a misread. i understand that putting on the skytrak (and any sim for that matter), is suspect, at best, but just looking for options.

              Comment

              • kdcdds
                Junior Member
                • Nov 2020
                • 18

                #10
                Here is my current and desired layout
                biggest concern is a lot of seam tape, but it should look pretty amazing

                Comment

                • 3on3putt
                  Champion Member
                  • Mar 2019
                  • 1315

                  #11
                  For putting, get one of those indoor putting mats that are about 7 feet in length and about a foot wide. Cut it to size and place it so it extends from your hitting mat to the screen. Put whatever you need to put underneath it so it's pretty much level with your hitting mat (or maybe just a hair lower). I put a board under mine. Helps tremendously with putting as you'll have a continuous roll on a smooth surface all the way to the screen. See the pic below.

                  When you putt, place the ball about 6 inches behind the red dot and roll it right over the red dot. Also turn on the straight putting patch in the settings file.
                  Attached Files
                  Last edited by 3on3putt; 01-01-2021, 01:20 AM.

                  Comment

                  • kdcdds
                    Junior Member
                    • Nov 2020
                    • 18

                    #12
                    awesome, thanks. what is the recommended distance to the screen for the skytrak. i think i am too far from the screen

                    Comment

                    • 3on3putt
                      Champion Member
                      • Mar 2019
                      • 1315

                      #13
                      Originally posted by kdcdds View Post
                      awesome, thanks. what is the recommended distance to the screen for the skytrak. i think i am too far from the screen
                      Distance from the screen does not matter for Skytrak.

                      Again, when you putt, place the ball a good 6 inches or so behind the red dot (in the direction opposite the target). Roll the ball right over (or very close to) the red dot. Putts should read about 97% of the time on Skytrak with no issue. Even very short putts.

                      If you're getting 25 foot reads on putts that roll 4 feet something is drastically wrong with your setup. You may want to open the TGC settings file and check to see what you have the stimp set to. It's probably set way too high. The skytrak is only measuring the ball very shortly after the red dot. Anything beyond that doesn't matter. I have estimated that my ratio is approximately 2:1. Meaning my putts that roll 8 feet in real life (just barely reaching my screen) go about 16 feet on the game. If I had a putting mat that was faster I could get it down to a 1:1 ratio.

                      Comment

                      • kdcdds
                        Junior Member
                        • Nov 2020
                        • 18

                        #14
                        I have almost finished my turf area. I worked on it for a few hours last night, but the rioting at congress somewhat captivated my attention, as you may be able to see on my screen (or whats left of my screen). anyway, i cut out for my plan, and inserted and taped all seams except the 2 where you see the tape. also, this is not secured to the floor as i dont think it will slide or move easily due to the weight. but here are the pictures. also note that it is not square to the screen, as it is moveable and i am just moving it around to increase my work area
                        Click image for larger version

Name:	image7 (1).jpeg
Views:	2040
Size:	18.5 KB
ID:	309796Click image for larger version

Name:	image0 (4).jpeg
Views:	1980
Size:	16.7 KB
ID:	309798Click image for larger version

Name:	image7 (1).jpeg
Views:	1924
Size:	18.5 KB
ID:	309799Click image for larger version

Name:	image0 (4).jpeg
Views:	2265
Size:	16.7 KB
ID:	309800Click image for larger version

Name:	image0 (4).jpeg
Views:	2069
Size:	16.7 KB
ID:	309802Click image for larger version

Name:	image5 (1).jpeg
Views:	1968
Size:	17.4 KB
ID:	309803Click image for larger version

Name:	image7 (1).jpeg
Views:	2037
Size:	18.5 KB
ID:	309804Click image for larger version

Name:	image0 (4).jpeg
Views:	2222
Size:	16.7 KB
ID:	309805Click image for larger version

Name:	image7 (1).jpeg
Views:	2347
Size:	18.5 KB
ID:	309806Click image for larger version

Name:	image0 (4).jpeg
Views:	2086
Size:	16.7 KB
ID:	309807
                        Attached Files

                        Comment


                        • MGoGolf
                          MGoGolf commented
                          Editing a comment
                          Great posts, love seeing this progress as I’m going through my own garage build. Do you have something you are using around the border of the turf to keep it down and make the transition smoother from the floor to the turf? It looks like one side has something but not sure.
                      • kdcdds
                        Junior Member
                        • Nov 2020
                        • 18

                        #15
                        screen will fold up and be attached to hooks on the ceiling. mat and turf area will roll up and be placed against the wall where the screen is located, so garage space can be used for multiple purposes. hopefully all sport systems will come thru soon with my screen and surround and everything will be completed.

                        Comment

                        Working...